Nginx on CentOS/RHEL 7

automated
 
advanced

Note:

Certbot is meant to be run on the server where your website is hosted. If you don't have administrative shell access to your webserver or you're not familiar with command line server administration, you should check if your hosting provider has built-in Let's Encrypt support by contacting them or checking this list of supporting providers.

Install

Certbot is packaged in EPEL (Extra Packages for Enterprise Linux). To use Certbot, you must first enable the EPEL repository. On RHEL or Oracle Linux, you must also enable the optional channel.

Note:

If you are using RHEL on EC2, you can enable the optional channel by running:

$ yum -y install yum-utils  $ yum-config-manager --enable rhui-REGION-rhel-server-extras rhui-REGION-rhel-server-optional  

After doing this, you can install Certbot by running:

Installing DNS plugins

Certbot's DNS plugins are available for your system. These plugins can be used to automate obtaining a wildcard certificate from Let's Encrypt's ACMEv2 server. To use one of these plugins, you must have configured DNS for the domain you want to obtain a certificate for with a DNS provider that Certbot has a plugin for. A list of these plugins and more information about using them can be found here. To install one of these plugins, run the installation command above but replace certbot python2-certbot-nginx with python2-certbot-dns-PLUGIN, where PLUGIN is the name of the plugin you want to install. For instance, for the RFC2136 plugin this would be python2-certbot-dns-rfc2136.

Get Started

Certbot has an Nginx plugin, which is supported on many platforms, and automates certificate installation.

Running this command will get a certificate for you and have Certbot edit your Nginx configuration automatically to serve it. If you're feeling more conservative and would like to make the changes to your Nginx configuration by hand, you can use the certonlysubcommand:

If you want to obtain a wildcard certificate using Let's Encrypt's new ACMEv2 server, you'll also need to use one of Certbot's DNS plugins. To do this, make sure the plugin for your DNS provider is installed using the instructions above and run a command like the following:

You'll need to replace dns-plugin with the name of the DNS plugin you want to use. You may also need to provide additional flags such as the path your API credentials as described in the documentation for the DNS plugin linked above.

To learn more about how to use Certbot read our documentation.

Automating renewal

Certbot can be configured to renew your certificates automatically before they expire. Since Let's Encrypt certificates last for 90 days, it's highly advisable to take advantage of this feature. You can test automatic renewal for your certificates by running this command:

If that appears to be working correctly, you can arrange for automatic renewal by adding a cron job or systemd timer which runs the following:

Note:

if you're setting up a cron or systemd job, we recommend running it twice per day (it won't do anything until your certificates are due for renewal or revoked, but running it regularly would give your site a chance of staying online in case a Let's Encrypt-initiated revocation happened for some reason). Please select a random minute within the hour for your renewal tasks.

An example cron job might look like this, which will run at noon and midnight every day:

More detailed information and options about renewal can be found in the full documentation.

woomhost

Hosting Package: Cloud Web Hosting 
Domain: virgins.ga
First Payment Amount: $0.00 USD
Recurring Amount: $0.00 USD
Billing Cycle: Free Account
Next Due Date: -

Login Details

Username: virginsg
Password: ;dEKp3vg7B8*4C

Control Panel URL: http://212.1.210.96:2082/
Once your domain has propagated, you may also use http://www.virgins.ga:2082/

Server Information

Server Name: Hosting24
Server IP: 212.1.210.96

If you are using an existing domain with your new hosting account, you will need to update the nameservers to point to the nameservers listed below.

Nameserver 1: ns33.boxsecured.com (185.28.23.90)
Nameserver 2: ns34.boxsecured.com (185.28.23.100)

Uploading Your Website

Temporarily you may use one of the addresses given below to manage your web site:

Temporary FTP Hostname: 212.1.210.96
Temporary Webpage URL: http://212.1.210.96/~virginsg/

And once your domain has propagated you may use the details below:

FTP Hostname: virgins.ga
Webpage URL: http://www.virgins.ga

Email Settings

For email accounts that you setup, you should use the following connection details in your email program:

POP3 Host Address: mail.virgins.ga
SMTP Host Address: mail.virgins.ga
Username: The email address you are checking email for
Password: As specified in your control panel

Thank you for choosing us.

---


How to Install ONLYOFFICE Document Server on CentOS 7

ONLYOFFICE Community Server is a multifunctional office suite with a web-based interface that can be installed on any Linux server. It's an open source office and productivity suite, integrated with a CRM system, document server, project management tools and email aggregator.

The ONLYOFFICE Document Server is an open source online office suite like 'Office Online' offered by Microsoft. It's online office suite for viewing and editing text, spreadsheets, and presentations. The ONLYOFFICE Document Server is fully compatible with Open XML formats like .docx, .xlsx, and .pptx. With Document Server, you can enable collaborative editing for your team in real time.

The ONLYOFFICE Document Server can be installed in two ways. We can install it via Docker or install manually on the Linux server. In this tutorial, we will guide you to install and configure 'ONLYOFFICE Document Server' manually on you Linux CentOS 7 server. We will install Document Server under Postgres database with Nginx as the web server.

Prerequisites

  • OS – Ubuntu CentOS 7 64-bit server with kernel 3.13 or later
  • RAM – 2GB or more – we will use 4GB
  • HDD – at least 2 GB of free space

What we will do

  1. Install Epel Repository and preparing the OS
  2. Install and Configure PostgreSQL
  3. Create Database for the ONLYOFFICE Document Server
  4. Install Nodejs
  5. Install Redis Server
  6. Install and Configure RabbitMQ Server
  7. Install and Configure ONLYOFFICE Document Server
  8. Generate New SSL Letsencrypt Certificates
  9. Enable HTTPS for ONLYOFFICE Document Server
  10. Configure Firewalld
  11. Testing

Step 1 – Install Epel Repository and preparing the OS

In this step, we will install third-party CentOS repository Epel (Extra Packages for Enterprise Linux) repository to the system. Install Epel repository with yum command below.

yum -y install epel-release

And for the ONLYOFFICE Document Server installation, we need to disable SELinux (Security-Enhanced Linux) by editing the configuration file '/etc/sysconfig/selinux'.

Disable SELinux by editing the config file with vim.

vim /etc/sysconfig/selinux

Change the 'selinux' value to 'disabled'.

selinux=disabled

Save and exit, then reboot the server.

If all is complete, please login again to the server and check the SELinux status with 'sestatus' command.

sestatus

Make sure the result is 'disabled'.

Install EPEL Repository on CentOS

Step 2 – Install and Configure PostgreSQL

The Document Server can be installed with MySQL and PostgreSQL database. And in this tutorial, we will use PostgreSQL instead of MySQL. Install PostgreSQL database from the repository with yum command.

yum -y install postgresql.x86_64 postgresql-server.x86_64 postgresql-contrib.x86_64

After the installation is complete, we need to initialize the database for the first time by running postgres setup below.

postgresql-setup initdb

Now start PostgreSQL and enable it to run launch automatically at system boot.

systemctl start postgresql
systemctl enable postgresql

PostgreSQL database will run on the localhost IP address with default port 5432 – check it with the netstat command.

netstat -plntu

Next, we need to edit the Postgres authentication file pg_hba.conf with vim.

vim /var/lib/pgsql/data/pg_hba.conf

Change the authentication method for localhost from 'ident' to 'trust' as below. This is for allowing authentication from the local server.

host    all             all             127.0.0.1/32            trust
host    all             all             ::1/128                 trust

Save and exit, then restart the PostgreSQL service.

systemctl restart postgresql

Install PostgreSQL database

PostgreSQL Installation and configuration has been completed.

Step 3 – Create the database for the ONLYOFFICE Document Server

PostgreSQL has been installed to the system, and we will create a new database and a new user for the ONLYOFFICE Document Server installation.

Log in to the 'postgres' user and access the postgres command line tool 'psql'.

su – postgres
psql

Change postgres password with your own password and do not use a default and easy password.

\password postgres
Enter new password:

Next, create a new database named 'onlyoffice' with username 'onlyoffice' and the password is 'onlyoffice123@'.

Create all of it by running postgres queries below.

create database onlyoffice;
create user onlyoffice with password 'onlyoffice123@';
grant all privileges on database onlyoffice to onlyoffice;

A new database and user for the Document Server installation has been created.

Create the database in Postgres

Step 4 – Install Nodejs

ONLYOFFICE Document Server require the Nodejs package v6.9.1+. We will install and use Nodejs v6.10 for this tutorial, and it can be installed from the nodesource.com repository.

Add the Nodejs nodesource repository with curl.

curl -sL https://rpm.nodesource.com/setup_6.x | sudo bash –

Nodesource repository has been added, now install Nodejs with yum command below.

yum install -y nodejs

And if the installation has been completed, check the node version with 'node -v' command.

node -v

Nodejs 6.10 installed to the system for the Document Server installation.

Install node.js

Step 5 – Install Redis Server

Redis is an in-memory database persistent on the disk. Used key-value data store for caching, and it's open source. The Document Server installation is required Redis for memory caching. Install Redis from the repository with the yum command below.

yum -y install redis

After the installation is complete, start it and enable it to run automatically at the boot time.

systemctl start redis
systemctl enable redis

By default, redis will run under the localhost IP address with port 6379. Check the port state status with the netstat command, and make sure the state status is 'LISTEN'.

netstat -plntu

Redis server is installed on the server now.

Install Redis Server

Step 6 – Install and Configure RabbitMQ Server

RabbitMQ is an open source message broker software that implements AMQP (Advanced Message Queuing Protocol). It's written in the Erlang language, can be installed for clustering and failover.

The RabbitMQ is required by the Document Server, and we need to install it to the system with the yum command.

yum -y install  rabbitmq-server

After the installation is complete, configure RabbitMQ server to run only on the localhost by creating a new configuration file 'rabbitmq-env.conf' in the rabbitmq directory.

vim /etc/rabbitmq/rabbitmq-env.conf

Paste configuration below.

export RABBITMQ_NODENAME=rabbit@localhost   export RABBITMQ_NODE_IP_ADDRESS=127.0.0.1   export ERL_EPMD_ADDRESS=127.0.0.1

Save and exit.

Start RabbitMQ Server and enable it to launch automatically everytime at system boot.

systemctl start rabbitmq-server
systemctl enable rabbitmq-server

Verify the RabbitMQ installation and configuration, check it with netstat command and you will see the RabbitMQ server is running under localhost IP address with port 5672.

netstat -plntu

Install RabbitMQ

Next, we need to create a new rabbitmq user for the ONLYOFFICE Document Server configuration. Create a new user onlyoffice with password onlyoffice123 with rabbitmqctl commands below.

rabbitmqctl add_user onlyoffice onlyoffice123
rabbitmqctl set_user_tags onlyoffice administrator
rabbitmqctl set_permissions -p / onlyoffice ".*" ".*" ".*"

Now check the new user and make sure the onlyoffice user is available on the list.

rabbitmqctl list_users

rabbitmqctl list_users

The RabbitMQ Server installation and configuration has been completed. And the new rabbitmq user for the Document Server is created.

Step 7 – Install and Configure ONLYOFFICE Document Server

Before we do the Document Server installation, we are required to install the Microsoft font installer and add new latest Nginx repository.

Install 'Microsoft fonts installer' with the yum command below.

yum -y install https://downloads.sourceforge.net/project/mscorefonts2/rpms/msttcore-fonts-installer-2.6-1.noarch.rpm

Add new latest Nginx repository to the 'yum.repos.d' directory by creating a new file nginx.repo.

vim /etc/yum.repos.d/nginx.repo

Paste configuration below.

[nginx]   name=nginx repo   baseurl=http://nginx.org/packages/centos/7/$basearch/   gpgcheck=0   enabled=1

Save and exit.

Next, add the ONLYOFFICE Document Server GPG key.

rpm –import "http://keyserver.ubuntu.com/pks/lookup?op=get&search=0x8320CA65CB2DE8E5"

And add new onlyoffice repository file 'onlyoffice.repo' file.

vim /etc/yum.repos.d/onlyoffice.repo

Paste the ONLYOFFICE Document Server repository below.

[onlyoffice]   name=onlyoffice repo   baseurl=http://download.onlyoffice.com/repo/centos/main/noarch/   gpgcheck=1   enabled=1

Save and exit, then install the Document Server.

yum -y install onlyoffice-documentserver

The command will install the Document Server with Nginx web server and the process control supervisor.

Start nginx and supervisord services, then enable it to start automatically at the boot time.

systemctl start nginx
systemctl start supervisord

systemctl enable nginx
systemctl enable supervisord

Start nginx

The Document Server installed, now configure it by executing the command below.

documentserver-configure.sh

You will be asked about the PostgreSQL database.

  • Host: localhost
  • Database name: onlyoffice
  • User: onlyoffice
  • Password: onlyoffice123@

You will be asked about redis configuration. And in this tutorial, redis is running under the server IP instead of the sock file. Type localhost and press 'Enter'.

And lastly, you will be asked about the RabbitMQ Server Credential for the Document Server.

  • Host: localhost:5672
  • User: onlyoffice
  • Password: onlyoffice123

Configure Document Server

The ONLYOFFICE Document Server installation and configuration has been completed.

Step 8 – Generate New SSL Letsencrypt Certificates

The ONLYOFFICE Document Server will run under the HTTPS Secure connection, and we need to generate new SSL certificate files. For this purpose, We will use free SSL Certificate from Letsencrypt.

Before generating certificate files, we need to stop nginx and firewalld services.

systemctl stop nginx
systemctl stop firewalld

Now install 'certbot' Letsencrypt client created by EFF (Electronic Frontier Foundation) from the repository.

yum -y install certbot

After the installation is complete, generate new certificate files for the Document Server domain name 'onlyoffice.hakase-labs.me' with the certbot command below.

certbot certonly –standalone -d onlyoffic.hakase-labs.me

You will be asked about your email, type your email address 'hakase-labs@gmail.com', then accept Term of Service (TOS) by typing 'A', and for the email sharing, type 'N' for no.

Generate SSL cert with Certbot

Next, type the domain name 'onlyoffice.hakase-labs.me' and wait for certbot generating certificate files for you. If there is no error, you will see the result as below.

Let's Encrypt SSL certificate has been created Successfully

New certificate files are now available in the '/etc/letsencrypt/live/' directory.

Next, create new SSL directory and copy generated certificate files to the SSL directory.

mkdir -p /etc/nginx/ssl
cd /etc/nginx/ssl/

Copy 'fullchain.pem' and 'privkey.pem' certificate files to the SSL directory.

cp /etc/letsencrypt/live/onlyoffice.irsyadf.me/fullchain.pem .
cp /etc/letsencrypt/live/onlyoffice.irsyadf.me/privkey.pem .

Next, generate the DHPARAM file to get more secure with OpenSSL command below.

openssl dhparam -out dhparam.pem 2048

After everything is complete, change the permission of all certificate files to 600.

chmod 600 *

Configurae SSL in Nginx

SSL Certificate files and DHPARAM file generated.

Step 9 – Enable HTTPS for ONLYOFFICE Document Server

The virtual host configuration for the Document Server is available under the 'conf.d' directory, and it's automatically created during the installation.

Please go to the nginx 'conf.d' directory.

cd /etc/nginx/conf.d/

Backup non-SSL virtual host configuration and copy new SSL template virtual host for the Document Server 'onlyoffice-documentserver-ssl.conf'.

mv onlyoffice-documentserver.conf onlyoffice-documentserver.conf.backup
cp onlyoffice-documentserver-ssl.conf.template onlyoffice-documentserver-ssl.conf

Edit the virtual host SSL file with vim.

vim onlyoffice-documentserver-ssl.conf

Change the server_name value to your domain line 7.

server_name onlyoffice.irsyadf.me;

Add new configuration below line '29', give the server_name with value as your domain name.

server_name onlyoffice.irsyadf.me;

Change the path of SSL files to your certificate files directory line 37-38, and disable the client side SSL certificate files as below.

ssl_certificate /etc/nginx/ssl/fullchain.pem;   ssl_certificate_key /etc/nginx/ssl/privkey.pem;   #ssl_verify_client {{SSL_VERIFY_CLIENT}};   #ssl_client_certificate {{CA_CERTIFICATES_PATH}};

For the HSTS configuration line 44, give the max-age a new value.

add_header Strict-Transport-Security max-age=31536000;

And for the DHPARAM file, change to your path directory line 68.

ssl_dhparam /etc/nginx/ssl/dhparam.pem;

Save and exit.

Then test the configuration file and make sure there is no error, then restart the nginx service.

nginx -t
systemctl restart nginx

Check Nginx configuration syntax

HTTPS for the ONLYOFFICE Document Server is enabled.

Step 10 – Configure Firewalld

If you do not have the Firewalld on your server, install it with the command below.

yum -y install firewalld

After the installation is complete, start it and add it to run automatically at the boot time.

systemctl start firewalld
systemctl enable firewalld

Next, add new HTTP and HTTPS services to the firewalld configuration with 'firewall-cmd' command.

firewall-cmd –permanent –add-service=http
firewall-cmd –permanent –add-service=https

Configure the Firewall

Reload the firewalld configuration, check all available services, and make sure HTTP and HTTPS are on the lists.

firewall-cmd –reload
firewall-cmd –list-all

List Firewall ports

Firewalld configuration for the Document Server has been completed.

Step 11 – Testing

Open your web browser, visit the Document Server domain name 'onlyoffice.hakase-labs.me' and you will be redirected to the HTTPS Secure connection. And make sure the result is as shown below.

Test ONLYOFFICE installation

We've successful installed ONLYOFFICE Document Server with PostgreSQL as the Database and Nginx as the web server using CentOS 7 system.

Reference

Install Nginx on CentOS 7 / RHEL 7

NGINX

Nginx is a popular lightweight server for those who do not need the bulk and extra services that Apache may offer. This article will look at installing Nginx on a CentOS using the 'yum' package manager.

Install Nginx:

To install Nginx using yum we need to include the Nginx repository, install the Nginx repository.

rpm -Uvh http://nginx.org/packages/centos/7/noarch/RPMS/nginx-release-centos-7-0.el7.ngx.noarch.rpm

Install the Nginx by issuing the following command.

yum install nginx

Starting Nginx:

Once installed, start the Nginix by using the following command.

systemctl start nginx.service

Once started. Navigate the web browser to Nginx server(IP Address or Host Name). The following image shows the default Welcome Screen of Nginx.

CentOS 7 - Nginx Default Page
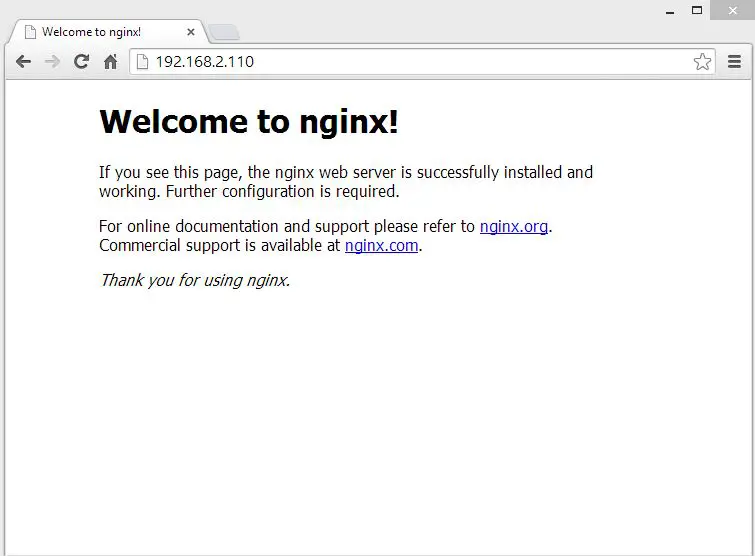
CentOS 7 – Nginx Default Page

Extras:

Init scripts will help you to start and stop the service. The init scripts for the Nginx is installed while installing Nginx. However, we need to set up Nginx to start automatically if the server is rebooted:

systemctl enable nginx.

Configuration File:

The name of the default configuration file is nginx.conf, located in /etc/nginx directory. Configuration file is based on directives and parameters, each directive ends with a semi colon. The following shows the directives for worker connection and in which user name Nginx process should run.

user  nginx;
worker_processes  1;
events {
worker_connections  1024;
}

Creating a Virtual Server:

We must setup at least one virtual server for Nginx, in order to process the HTTP request by Nginx. When Nginx process the request,  it looks for the server directive which is placed in http context. You can add multiple server directives, to define multiple virtual servers.

Default virtual server config can be found under /etc/nginx/conf.d directory, if you open and see that; first line itself a virtual server for localhost and listening on port 80.

server {
listen       80;
server_name  localhost;
}

You will find the location directive, which will tell the server to look for the static file when the requests comes for the localhost.

location / {
root   /usr/share/nginx/html;
index  index.html index.htm;
}

Additionally you can mention the error pages.

error_page   500 502 503 504  /50x.html;
location = /50x.html {
root   /usr/share/nginx/html;
}

The above is the minimum configuration for a virtual server, you can find the full configuration here.

Example:

The following virtual server will accept the request for server.itzgeek.com, create a configuration file  in /etc/nginx/conf.d or copy the default configuration file.

cp /etc/nginx/conf.d/default.conf /etc/nginx/conf.d/itzgeek.conf

Edit in such a way that, it receives the request. Minimal configuration will look like below.

vi /etc/nginx/conf.d/itzgeek.conf
server {
listen       80;
server_name  server.itzgeek.com;
location / {
root   /usr/share/nginx/html/itzgeek;
index  index.html index.htm;
}
}

Create root directory.

mkdir /usr/share/nginx/html/itzgeek

Create Index.html page.

echo "This is ITzGeek Home" > /usr/share/nginx/html/itzgeek/index.html

Restart the Nginx service.

 systemctl restart nginx.service

Test with browser, url will be http://server.itzgeek.com

CentOS 7 - Nginx Virtual ServerCentOS 7 – Nginx Virtual Server

That's all.

how to setup Nginx, php-fpm

The well known, good'ol LAMP stack has slowly made place for a LEMP stack in many of my configurations. Enough articles have been written on why Apache or Nginx are better in certain situations, but I like the clean way of configuration that Nginx uses. (pronounced Engine X, hence the E in LEMP). So I generally use Nginx. I however never made an article about it, so here it is, long overdue.


Install Nginx

There are generally three options to install Nginx. First option is to use packages from the vendor, this however leaves you with a older version of Nginx. In the base repository's of Centos 7, Nginx is not included. So you need to install epel-release if you wish to go that route, at the time of writing, the available package is 1.10.2.This is the fastest option and large chance it will be updated more frequently then when you manually download and compile it. However if you wan't the newest features this is the better option. A third option is to use external repository's. All methods will result in a working setup.

1) Install Nginx using epel

(recommended method)

  • yum install epel-release
  • yum install nginx
2) Install Nginx from binary packages

Add /etc/yum.repos.d/nginx.repo

  • [nginx]
  • name=nginx repo
  • baseurl=http://nginx.org/packages/mainline/centos/$releasever/$basearch/
  • gpgcheck=0
  • enabled=1

Then run yum install nginx

note this installs the mainline.

3) Install Nginx straight from source

Notice that there is a difference between mainline and stable version

  • cd /opt
  • mkdir nginx
  • cd nginx
  • # check the latest version on : http://nginx.org/en/download.html
  • wget http://nginx.org/download/nginx-1.11.10.tar.gz
  • # untar
  • tar xzvf nginx-1.11.10.tar.gz
  • # install dependencies
  • yum install gcc pcre-devel zlib-devel openssl-devel
  • # configure
  • ./configure --with-http_ssl_module
  • # make and make install
  • make
  • make install
4) Install Nginx from external repo

You could use webtatic to install nginx; This is similar to how I am going to install php-fpm :

  • rpm -Uvh https://mirror.webtatic.com/yum/el7/webtatic-release.rpm
  • yum install nginx1w

for more detailed instructions, and dynamic modules, see there blogpost.

Install PHP

Installing PHP (lemP) is done using the php-fpm package (PHP FastCGI Process Manager) now sadly in the epel-release the version is super outdated at this writing : PHP 5.4. This version is no longer supported, on top of that, its pretty clear that PHP 7+ is faster and less resource hungry. Whatever version you chose, either should work. I use webtatic as repository and have found no issue's so far. For PHP 7.1 : (on Centos 7)

  • rpm -Uvh https://mirror.webtatic.com/yum/el7/webtatic-release.rpm

After that you are ready to install PHP :

  • yum install php71w-fpm php71w-opcache php71w-mysqlnd php71w-mcrypt php71w-gd php71w-xml
Configure php-fpm

After the installation its time to finetune our setup a bit. Let's start with php-fpm , we need to change /etc/php-fpm.d/www.conf

Change both the user and the group to nginx.

  • ; Start a new pool named 'www'.
  • [www]
  • ; Unix user/group of processes
  • ; Note: The user is mandatory. If the group is not set, the default user$
  • ; will be used.
  • ; RPM: apache Choosed to be able to access some dir as httpd
  • user = nginx
  • ; RPM: Keep a group allowed to write in log dir.
  • group = nginx
  • [...]

note : it's possible to let Nginx use a socket instead of loopback device. This is a bit faster, but I found that the headache is not really worth it.

Configure Nginx

Depending on the installation there is already a default server configuration. I tend to remove it and replace it with an empty file and create a file [name].conf in /etc/nginx/conf.d/

http server
  • server {
  • # listen to port 80
  • listen 80;
  • # server name or names
  • server_name svennd.be;
  • # the location of webroot
  • # I always use /var/www/html/*
  • # Nginx by default uses another structure
  • # but this made the transition from Apache allot easier!
  • root /var/www/html/svennd.be;
  • # in root location
  • location / {
  • # look for index.php/index.html/index.htm as "index file"
  • index index.php index.html index.htm;
  • # this is specifically for wordpress
  • # makes it possible to have url rewrites
  • try_files $uri $uri/ /index.php?$args;
  • }
  • # default error pages
  • # note that wp already catches most
  • error_page 404 /404.html;
  • error_page 500 502 503 504 /50x.html;
  • location = /50x.html {
  • root /usr/share/nginx/html;
  • }
  • # here we have to let nginx know what to do with these php files
  • # as html files are just send directly to the client
  • location ~ \.php$ {
  • # if the file is not there show a error : mynonexistingpage.php -> 404
  • try_files $uri =404;
  • # pass to the php-fpm server
  • fastcgi_pass 127.0.0.1:9000;
  • # also for fastcgi try index.php
  • fastcgi_index index.php;
  • # some tweaking
  • fastcgi_param SCRIPT_FILENAME $document_root$fastcgi_script_name;
  • fastcgi_param SCRIPT_NAME $fastcgi_script_name;
  • fastcgi_buffer_size 128k;
  • fastcgi_buffers 256 16k;
  • fastcgi_busy_buffers_size 256k;
  • fastcgi_temp_file_write_size 256k;
  • include fastcgi_params;
  • }
  • }

Note that fastcgi_params are installed by php-fpm. In case its missing use the link.

https server

Be sure to check cipherli.st for the latest updates.

  • server {
  • listen 443 ssl;
  • server_name svennd.be;
  • root /var/www/html/svennd.be;
  • ssl_certificate /opt/letsencrypt/certs/svennd.be/fullchain.pem;
  • ssl_certificate_key /opt/letsencrypt/certs/svennd.be/privkey.pem;
  • # verify chain of trust of OCSP response using Root CA and Intermediate certs
  • ssl_trusted_certificate /opt/letsencrypt/certs/svennd.be/chain.pem;
  • ssl_session_timeout 1d;
  • ssl_session_cache shared:SSL:50m;
  • ssl_session_tickets off;
  • # Diffie-Hellman parameter for DHE ciphersuites, recommended 2048 bits
  • ssl_dhparam /opt/letsencrypt/certs/dhparam.pem;
  • # needs more info
  • ssl_ecdh_curve secp384r1; # Requires nginx >= 1.1.0
  • # suggested conf (interwebz)
  • ssl_protocols TLSv1 TLSv1.1 TLSv1.2;
  • ssl_ciphers "EECDH+AESGCM:EDH+AESGCM:ECDHE-RSA-AES128-GCM-SHA256:AES256+EECDH:DHE-RSA-AES128-GCM-SHA256:AES256+EDH:ECDHE-RSA-AES256-GCM-SHA384:DHE-RSA-AES256-GCM-SHA384:ECDHE-RSA-AES256-SHA384:ECDHE-RSA-AES128-SHA256:ECDHE-RSA-AES256-SHA:ECDHE-RSA-AES128-SHA:DHE-RSA-AES256-SHA256:DHE-RSA-AES128-SHA256:DHE-RSA-AES256-SHA:DHE-RSA-AES128-SHA:ECDHE-RSA-DES-CBC3-SHA:EDH-RSA-DES-CBC3-SHA:AES256-GCM-SHA384:AES128-GCM-SHA256:AES256-SHA256:AES128-SHA256:AES256-SHA:AES128-SHA:DES-CBC3-SHA:HIGH:!aNULL:!eNULL:!EXPORT:!DES:!MD5:!PSK:!RC4";
  • ssl_prefer_server_ciphers on;
  • # OCSP Stapling ---
  • # fetch OCSP records from URL in ssl_certificate and cache them
  • ssl_stapling on;
  • ssl_stapling_verify on;
  • # need to lookup options
  • resolver 8.8.8.8 valid=300s;
  • resolver_timeout 5s;
  • # headers
  • # note HSTS might break your website if initial setup !
  • # add_header Strict-Transport-Security "max-age=15768000; includeSubDomains; preload";
  • # add_header X-Frame-Options DENY;
  • add_header X-Content-Type-Options nosniff;
  • add_header X-XSS-Protection "1; mode=block";
  • # hide version
  • server_tokens off;
  • location / {
  • index index.php index.html index.htm;
  • try_files $uri $uri/ /index.php?$args;
  • }
  • error_page 404 /404.html;
  • error_page 500 502 503 504 /50x.html;
  • location = /50x.html {
  • root /usr/share/nginx/html;
  • }
  • location ~ \.php$ {
  • try_files $uri =404;
  • fastcgi_pass 127.0.0.1:9000;
  • fastcgi_index index.php;
  • fastcgi_param SCRIPT_FILENAME $document_root$fastcgi_script_name;
  • fastcgi_param SCRIPT_NAME $fastcgi_script_name;
  • fastcgi_buffer_size 128k;
  • fastcgi_buffers 256 16k;
  • fastcgi_busy_buffers_size 256k;
  • fastcgi_temp_file_write_size 256k;
  • include fastcgi_params;
  • }
  • }
Install MariaDB

There are two options to install MariaDB, either from the Centos/RHEL repo's or a newer version from MariaDB's repo helper. For simplicity I use the Centos, MariaDB 5.5.52 version. But you can get the 10.1/10.2 if you like.

Install from base repository :

  • yum install mariadb-server

Start the mariadb-server prior to configuration :

  • systemctl enable mariadb
  • systemctl start mariadb

configure mariadb :

  • mysql_secure_installation
Start the server

After that you are ready to run the server :

  • systemctl start php-fpm
  • systemctl enable php-fpm
  • systemctl start nginx
  • systemctl enable nginx

And that's how I generally set up Nginx and php-fpm.


Respectfully yours,

Tiruchirappalli Sivashanmugam
Founder of Arththavial    
Founder President, Genius Mother Institute
Founder President, Intellectual Development Foundation
   p.ss@msn.com
   +91-9444499818
   13/1, Agrahara Manappalli - 637017 - India

விதியில் இல்லாதது மதியில் தோன்றாது