.htaccess for apache

#
# Sources:
# http://stackoverflow.com/questions/7704624/how-can-i-use-gzip-compression-for-css-and-js-files-on-my-websites
# http://codex.wordpress.org/Output_Compression
# http://www.perun.net/2009/06/06/wordpress-websites-beschleuinigen-4-ein-zwischenergebnis/#comment-61086
# http://www.smashingmagazine.com/smashing-book-1/performance-optimization-for-websites-part-2-of-2/
# http://gtmetrix.com/configure-entity-tags-etags.html
# http://de.slideshare.net/walterebert/die-htaccessrichtignutzenwchh2014
# http://de.slideshare.net/walterebert/mehr-performance-fr-wordpress
#

<IfModule mod_deflate.c>
# Insert filters / compress text, html, javascript, css, xml:
AddOutputFilterByType DEFLATE text/plain
AddOutputFilterByType DEFLATE text/javascript
AddOutputFilterByType DEFLATE text/html
AddOutputFilterByType DEFLATE text/xml
AddOutputFilterByType DEFLATE text/css
AddOutputFilterByType DEFLATE text/vtt
AddOutputFilterByType DEFLATE text/x-component
AddOutputFilterByType DEFLATE application/xml
AddOutputFilterByType DEFLATE application/xhtml+xml
AddOutputFilterByType DEFLATE application/rss+xml
AddOutputFilterByType DEFLATE application/js
AddOutputFilterByType DEFLATE application/javascript
AddOutputFilterByType DEFLATE application/x-javascript
AddOutputFilterByType DEFLATE application/x-httpd-php
AddOutputFilterByType DEFLATE application/x-httpd-fastphp
AddOutputFilterByType DEFLATE application/atom+xml
AddOutputFilterByType DEFLATE application/json
AddOutputFilterByType DEFLATE application/ld+json
AddOutputFilterByType DEFLATE application/vnd.ms-fontobject
AddOutputFilterByType DEFLATE application/x-font-ttf
AddOutputFilterByType DEFLATE application/x-web-app-manifest+json
AddOutputFilterByType DEFLATE font/opentype
AddOutputFilterByType DEFLATE image/svg+xml
AddOutputFilterByType DEFLATE image/x-icon

# Exception: Images
SetEnvIfNoCase REQUEST_URI \.(?:gif|jpg|jpeg|png)$ no-gzip dont-vary

# Drop problematic browsers
BrowserMatch ^Mozilla/4 gzip-only-text/html
BrowserMatch ^Mozilla/4\.0[678] no-gzip
BrowserMatch \bMSI[E] !no-gzip !gzip-only-text/html

# Make sure proxies don't deliver the wrong content
<IfModule mod_headers.c>
Header append Vary User-Agent env=!dont-vary
</IfModule>

</IfModule>


## EXPIRES CACHING ##
<IfModule mod_expires.c>
ExpiresActive On
ExpiresDefault "access plus 1 week"
ExpiresByType image/jpg "access plus 1 year"
ExpiresByType image/jpeg "access plus 1 year"
ExpiresByType image/gif "access plus 1 year"
ExpiresByType image/png "access plus 1 year"
ExpiresByType image/svg+xml "access plus 1 month"
ExpiresByType text/css "access plus 1 month"
ExpiresByType text/html "access plus 1 minute"
ExpiresByType text/plain "access plus 1 month"
ExpiresByType text/x-component "access plus 1 month"
ExpiresByType text/javascript "access plus 1 month"
ExpiresByType text/x-javascript "access plus 1 month"
ExpiresByType application/pdf "access plus 1 month"
ExpiresByType application/javascript "access plus 1 months"
ExpiresByType application/x-javascript "access plus 1 months"
ExpiresByType application/x-shockwave-flash "access plus 1 month"
ExpiresByType image/x-icon "access plus 1 year"
ExpiresByType application/json "access plus 0 seconds"
ExpiresByType application/ld+json "access plus 0 seconds"
ExpiresByType application/xml "access plus 0 seconds"
ExpiresByType text/xml "access plus 0 seconds"
ExpiresByType application/x-web-app-manifest+json "access plus 0 seconds"
ExpiresByType text/cache-manifest "access plus 0 seconds"
ExpiresByType audio/ogg "access plus 1 month"
ExpiresByType video/mp4 "access plus 1 month"
ExpiresByType video/ogg "access plus 1 month"
ExpiresByType video/webm "access plus 1 month"
ExpiresByType application/atom+xml "access plus 1 hour"
ExpiresByType application/rss+xml "access plus 1 hour"
ExpiresByType application/font-woff "access plus 1 month"
ExpiresByType application/vnd.ms-fontobject "access plus 1 month"
ExpiresByType application/x-font-ttf "access plus 1 month"
ExpiresByType font/opentype "access plus 1 month"
</IfModule>
## EXPIRES CACHING ##


#Alternative caching using Apache's "mod_headers", if it's installed.
#Caching of common files - ENABLED
<IfModule mod_headers.c>
<FilesMatch "\.(ico|pdf|flv|swf|js|css|gif|png|jpg|jpeg|txt|html|htm)$">
Header set Cache-Control "max-age=2592000, public"
</FilesMatch>
</IfModule>


<IfModule mod_headers.c>
  <FilesMatch "\.(js|css|xml|gz)$">
    Header append Vary Accept-Encoding
  </FilesMatch>
</IfModule>


<IfModule mod_gzip.c>
  mod_gzip_on Yes
  mod_gzip_dechunk Yes
  mod_gzip_item_include file \.(html?|txt|css|js|php|pl)$
  mod_gzip_item_include handler ^cgi-script$
  mod_gzip_item_include mime ^text/.*
  mod_gzip_item_include mime ^application/x-javascript.*
  mod_gzip_item_exclude mime ^image/.*
  mod_gzip_item_exclude rspheader ^Content-Encoding:.*gzip.*
</IfModule>

# Set Keep Alive Header
# This *just* sets the header - maybe your hoster is not allowing this feature
# Please check if it is working with tools like http://www.webpagetest.org
<IfModule mod_headers.c>
    Header set Connection keep-alive
</IfModule>

# If your server don't support ETags deactivate with "None" (and remove header)
<IfModule mod_expires.c>
  <IfModule mod_headers.c>
    Header unset ETag
  </IfModule>
  FileETag None
</IfModule>


Support & Strengthen Sivashanmugam

Respectfully yours,

Tiruchirappalli Sivashanmugam

   p.ss@msn.com
   +91-9444499818
   13/1, Agrahara Manappalli - 637017 - India

Filmora

First of all block program from accessing the internet. Use windows hosts file to do that. add the following lines to your windows hosts file : 127.0.0.1 cbs.wondershare.com 127.0.0.1 www.cbs.wondershare.com 127.0.0.1 platform.wondershare.com 127.0.0.1 www.wondershare.com install Wondershare Filmora 9.1.0.11 (x64 bit).exe (Provided) inside default directory. after that, Use Keygen.exe (to generate the serial key) & to register program. Use any fake email address to register program. Do not update the program. "otherwise the license will get blacklisted"

Software was originally posted at : https://www.piratecity.co/softwares/wondershare-filmora-cracked/  

Working copies owncloud x

<?php
$CONFIG = array (
  'instanceid' => 'ocgawawix5k2',
  'passwordsalt' => 'xku8CqiWzVfLVAvTjvVDG6uv+K7n87',
  'secret' => 'wvBA2lNTf0TZyQZW8HSvjOh8jbYff75P85aNM6YDInCPsCgm',
  'trusted_domains' =>
  array (
    0 => 'cloud.fteindia.com',
  ),
  'datadirectory' => '/usr/share/nginx/cloud.fteindia.com/data',
  'overwrite.cli.url' => 'https://cloud.fteindia.com',
  'dbtype' => 'mysql',
  'version' => '10.1.0.4',
  'dbname' => 'ftecloud',
  'dbhost' => 'localhost:5432',
  'dbtableprefix' => 'oc_',
  'dbuser' => 'ftecloud',
  'dbpassword' => 'sujasivashanmugam',
  'logtimezone' => 'UTC',
  'installed' => true,
);

nginx conf


upstream php-handler {
      server 127.0.0.1:9000;
      # Depending on your used PHP version
      #server unix:/var/run/php5-fpm.sock;
      #server unix:/var/run/php7-fpm.sock;
  }

  server {
      listen 80;
      server_name cloud.fteindia.com;

      # For SSL certificate verifications, this needs to be served via HTTP
      location /.well-known/(acme-challenge|pki-validation)/ {
          root /usr/share/nginx/cloud.fteindia.com; # Specify here where the challenge file is placed
      }

      # enforce https
      location / {
          return 301 https://$server_name$request_uri;
      }
  }

  server {
      listen 443 ssl http2;
      server_name cloud.fteindia.com;

      ssl_certificate /etc/letsencrypt/live/cloud.fteindia.com/fullchain.pem; # managed by Certbot
      ssl_certificate_key /etc/letsencrypt/live/cloud.fteindia.com/privkey.pem; # managed by Certbot

      # Example SSL/TLS configuration. Please read into the manual of NGINX before applying these.
      ssl_session_timeout 5m;
      ssl_protocols TLSv1 TLSv1.1 TLSv1.2;
      ssl_ciphers "-ALL:EECDH+AES256:EDH+AES256:AES256-SHA:EECDH+AES:EDH+AES:!ADH:!NULL:!aNULL:!eNULL:!EXPORT:!LOW:!MD5:!3DES:!PSK:!SRP:!DSS:!AESGCM:!RC4";
      # ssl_dhparam /etc/nginx/dh4096.pem;
      ssl_prefer_server_ciphers on;
      keepalive_timeout    70;
      ssl_stapling on;
      ssl_stapling_verify off;

      # Add headers to serve security related headers
      # The always parameter ensures that the header is set for all responses, including internally generated error responses.
      # Before enabling Strict-Transport-Security headers please read into this topic first.
      # https://www.nginx.com/blog/http-strict-transport-security-hsts-and-nginx/

      #add_header Strict-Transport-Security "max-age=15552000; includeSubDomains; preload" always;
      add_header X-Content-Type-Options nosniff always;
      add_header X-Frame-Options "SAMEORIGIN" always;
      add_header X-XSS-Protection "1; mode=block" always;
      add_header X-Robots-Tag none always;
      add_header X-Download-Options noopen always;
      add_header X-Permitted-Cross-Domain-Policies none always;

      # Path to the root of your installation
      root /usr/share/nginx/cloud.fteindia.com/;

      location = /robots.txt {
          allow all;
          log_not_found off;
          access_log off;
      }

      # The following 2 rules are only needed for the user_webfinger app.
      # Uncomment it if you're planning to use this app.

      #rewrite ^/.well-known/host-meta /public.php?service=host-meta last;
      #rewrite ^/.well-known/host-meta.json /public.php?service=host-meta-json last;

      location = /.well-known/carddav {
          return 301 $scheme://$host/remote.php/dav;
      }
      location = /.well-known/caldav {
          return 301 $scheme://$host/remote.php/dav;
      }

      # set max upload size
      client_max_body_size 512M;
      fastcgi_buffers 8 4K;                     # Please see note 1
      fastcgi_ignore_headers X-Accel-Buffering; # Please see note 2

      # Disable gzip to avoid the removal of the ETag header
      # Enabling gzip would also make your server vulnerable to BREACH
      # if no additional measures are done. See https://bugs.debian.org/cgi-bin/bugreport.cgi?bug=773332
      gzip off;

      # Uncomment if your server is build with the ngx_pagespeed module
      # This module is currently not supported.
      #pagespeed off;

      error_page 403 /core/templates/403.php;
      error_page 404 /core/templates/404.php;

      location / {
          rewrite ^ /index.php$uri;
      }

      location ~ ^/(?:build|tests|config|lib|3rdparty|templates|data)/ {
          return 404;
      }
      location ~ ^/(?:\.|autotest|occ|issue|indie|db_|console) {
          return 404;
      }

      location ~ ^/(?:index|remote|public|cron|core/ajax/update|status|ocs/v[12]|updater/.+|ocs-provider/.+|ocm-provider/.+|core/templates/40[34])\.php(?:$|/) {
          fastcgi_split_path_info ^(.+\.php)(/.*)$;
          include fastcgi_params;
          fastcgi_param SCRIPT_FILENAME $document_root$fastcgi_script_name;
          fastcgi_param SCRIPT_NAME $fastcgi_script_name; # necessary for owncloud to detect the contextroot https://github.com/owncloud/core/blob/v10.0.0/lib/private/AppFramework/Http/Request.php#L603
          fastcgi_param PATH_INFO $fastcgi_path_info;
          fastcgi_param HTTPS on;
          fastcgi_param modHeadersAvailable true; #Avoid sending the security headers twice
          fastcgi_param front_controller_active true;
          fastcgi_read_timeout 180; # increase default timeout e.g. for long running carddav/ caldav syncs with 1000+ entries
          fastcgi_pass php-handler;
          fastcgi_intercept_errors on;
          fastcgi_request_buffering off; #Available since NGINX 1.7.11
      }

      location ~ ^/(?:updater|ocs-provider|ocm-provider)(?:$|/) {
          try_files $uri $uri/ =404;
          index index.php;
      }

      # Adding the cache control header for js and css files
      # Make sure it is BELOW the PHP block
      location ~ \.(?:css|js)$ {
          try_files $uri /index.php$uri$is_args$args;
          add_header Cache-Control "max-age=15778463" always;

          # Add headers to serve security related headers (It is intended to have those duplicated to the ones above)
          # The always parameter ensures that the header is set for all responses, including internally generated error responses.
          # Before enabling Strict-Transport-Security headers please read into this topic first.
          # https://www.nginx.com/blog/http-strict-transport-security-hsts-and-nginx/

          #add_header Strict-Transport-Security "max-age=15552000; includeSubDomains; preload" always;
          add_header X-Content-Type-Options nosniff always;
          add_header X-Frame-Options "SAMEORIGIN" always;
          add_header X-XSS-Protection "1; mode=block" always;
          add_header X-Robots-Tag none always;
          add_header X-Download-Options noopen always;
          add_header X-Permitted-Cross-Domain-Policies none always;
          # Optional: Don't log access to assets
          access_log off;
      }

      location ~ \.(?:svg|gif|png|html|ttf|woff|ico|jpg|jpeg|map|json)$ {
          add_header Cache-Control "public, max-age=7200" always;
          try_files $uri /index.php$uri$is_args$args;
          # Optional: Don't log access to other assets
          access_log off;
      }
  }

-------------

to remove all php version

yum remove php*

-------------------

How to create a user in MySQL/MariaDB and grant permissions on a specific database

How to create a user in MySQL/MariaDB and grant permissions on a specific database

Logos de MariaDB y MySQLCreating a user in MySQL or MariaDB and granting permissions to him to access a specific database and be able to write data on it is a very usual task that is necessary to perform each time you install a new application based on any of these database engines, like web applications running on top of LAMP stack. Whether it is a simple WordPress, or a more complex application tailor made, one way or another you will always have to complete these steps at some point before its deployment.

These commands are valid to be executed both from the generic MySQL command line interface and from any other tool that allows to execute SQL commands against a MySQL instance such as phpMyAdmin or MySQL Workbench. They can also be run in MariaDB with identical result.

1. Database creation

mysql> CREATE DATABASE `mydb`;

2. User creation

mysql> CREATE USER 'myuser' IDENTIFIED BY 'mypassword';

3. Grant permissions to access and use the MySQL server

Only allow access from localhost (this is the most secure and common configuration you will use for a web application):

mysql> GRANT USAGE ON *.* TO 'myuser'@localhost IDENTIFIED BY 'mypassword';

To allow access to MySQL server from any other computer on the network:

mysql> GRANT USAGE ON *.* TO 'myuser'@'%' IDENTIFIED BY 'mypassword';

4. Grant all privileges to a user on a specific database

mysql> GRANT ALL privileges ON `mydb`.* TO 'myuser'@localhost;

As in the previous command, if you want the user to work with the database from any location you will have to replace localhost with '%'.

5. Apply changes made

To be effective the new assigned permissions you must finish with the following command:

mysql> FLUSH PRIVILEGES;

6. Verify your new user has the right permissions

mysql> SHOW GRANTS FOR 'myuser'@localhost;       +--------------------------------------------------------------+   | Grants for myuser@localhost                                  |   +--------------------------------------------------------------+   | GRANT USAGE ON *.* TO 'myuser'@'localhost'                   |   | GRANT ALL PRIVILEGES ON `mydb`.* TO 'myuser'@'localhost'     |   +--------------------------------------------------------------+   2 rows in set (0,00 sec)

If you made a mistake at some point you can undo all the steps above by executing the following commands, taking the precaution of replacing localhost with '%' if you also changed it in the previous commands:

DROP USER myuser@localhost;  DROP DATABASE mydb;

Finally, here is a very simple and small script in Bash that will help you to do all this in a much faster and direct way. Simply change your user and database names, and that's it:

#! /bin/bash    newUser='testuser'  newDbPassword='testpwd'  newDb='testdb'  host=localhost  #host='%'     commands="CREATE DATABASE \`${newDb}\`;CREATE USER '${newUser}'@'${host}' IDENTIFIED BY '${newDbPassword}';GRANT USAGE ON *.* TO '${newUser}'@'${host}' IDENTIFIED BY '${newDbPassword}';GRANT ALL privileges ON \`${newDb}\`.*  TO '${newUser}'@'${host}';FLUSH PRIVILEGES;"    echo "${commands}" | /usr/bin/mysql -u root -p

working copy of nginx virtual host

#
# Virtual host sivashanmugam.ga
#


server {
    listen       80;
    server_name  sivashanmugam.ga;
   
    root   /usr/share/nginx/sivashanmugam.ga;

    location ~ \.php$ {
        fastcgi_pass 127.0.0.1:9001;
        fastcgi_index index.php;
        fastcgi_param  SCRIPT_FILENAME  $document_root$fastcgi_script_name;
        include fastcgi_params;
    }

}

Respectfully yours,

Tiruchirappalli Sivashanmugam
Founder of Arththavial    
Founder President, Genius Mother Institute
Founder President, Intellectual Development Foundation
   p.ss@msn.com
   +91-9444499818
   13/1, Agrahara Manappalli - 637017 - India

விதியில் இல்லாதது மதியில் தோன்றாது


How to Run Multiple Websites with Different PHP Versions in Nginx

Sometimes PHP developers want to build and run different websites/applications using different versions of PHP on the same web server. As a Linux system administrator, you are required to setup a environment where you can run multiple websites using different PHP version on a single web server i.e. Nginx.

In this tutorial, we will explain you how to install multiple versions of PHP and configure the web server Nginx to work with them via the server blocks (virtual hosts in Apache) in CentOS/RHEL 7 distributions using LEMP stack.

Read Also: Pyenv – Install Multiple Python Versions for Specific Project

Nginx uses PHP-FPM (stands for FastCGI Process Manager), which is an alternative PHP FastCGI implementation with some extra, useful features for heavily loaded websites.

Testing Environment Setup

  1. A CentOS 7 or RHEL 7 server with minimal installation.
  2. Nginx HTTP Server.
  3. PHP 7.1 (to be used as default version) and 5.6.
  4. MariaDB Database Server.
  5. Server IP address: 192.168.56.10.
  6. Websites: example1.com and example2.com.

Step 1: Installing and Enabling EPEL and Remi Repository

1. First start by installing and enabling the EPEL and Remi repository, which offers the latest versions of the PHP stack on CentOS/RHEL 7 distributions.

# yum install https://dl.fedoraproject.org/pub/epel/epel-release-latest-7.noarch.rpm # yum install http://rpms.remirepo.net/enterprise/remi-release-7.rpm 

2. Next install the yum-utils package, which extends yum's native functionalities and provides yum-config-manager command, which is used to enable or disable Yum repositories on the system.

# yum install yum-utils 

Note: On RHEL 7 you can enable the optional channel for some dependencies using the following command.

# subscription-manager repos --enable=rhel-7-server-optional-rpms 

Step 2: Installing Nginx Web Server

3. To install latest version of Nginx, we need to add the official Nginx repository, create a file named /etc/yum.repos.d/nginx.repo.

# vi /etc/yum.repos.d/nginx.repo 

Add the following lines to file as per your distribution.

--------------- On CentOS 7 ---------------  [nginx]  name=nginx repo  baseurl=http://nginx.org/packages/centos/7/$basearch/  gpgcheck=0  enabled=1    --------------- On RHEL 7 --------------- [nginx]  name=nginx repo  baseurl=http://nginx.org/packages/rhel/7.x/$basearch/  gpgcheck=0  enabled=1  

4. Once nginx repo has been added, you can install Nginx using yum package manager tool as shown.

# yum install nginx 

Step 3: Installing MariaDB Database Server

5. To install latest version of MariaDB, we need to add the official MariaDB repository, create a file named /etc/yum.repos.d/mariadb.repo.

# vi /etc/yum.repos.d/mariadb.repo 

Add the following lines to file as per your distribution.

--------------- On CentOS 7 ---------------  [mariadb] name = MariaDB baseurl = http://yum.mariadb.org/10.2/centos7-amd64 gpgkey=https://yum.mariadb.org/RPM-GPG-KEY-MariaDB gpgcheck=1   --------------- On RHEL 7 --------------- [mariadb] name = MariaDB baseurl = http://yum.mariadb.org/10.2/rhel7-amd64 gpgkey=https://yum.mariadb.org/RPM-GPG-KEY-MariaDB gpgcheck=1  

6. Once MariaDB repo has been added, you can install MariaDB using yum package manager tool as shown.

# yum install MariaDB-client MariaDB-server 

7. Afterwards, secure the database server installation using the script below. Set a root password and answer y and press [Enter] for the rest of the subsequent questions to disable remote root user login, remove anonymous-user accounts and test database which by default can be accessed by all users, even anonymous users.

# mysql_secure_installation 

Read Also: 12 MySQL/MariaDB Security Best Practices for Linux

Step 4: Installing Multiple Versions of PHP

8. To install different versions of PHP for your projects, use yum-config-manager command to install multiple versions of PHP along with most required modules as shown.

Install PHP 7.1 Version

# yum-config-manager --enable remi-php71  [Default] # yum install php php-common php-fpm # yum install php-mysql php-pecl-memcache php-pecl-memcached php-gd php-mbstring php-mcrypt php-xml php-pecl-apc php-cli php-pear php-pdo 

Install PHP 5.6 Version

# yum install php56 php56-php-common php56-php-fpm # yum install php56-php-mysql php56-php-pecl-memcache php56-php-pecl-memcached php56-php-gd php56-php-mbstring php56-php-mcrypt php56-php-xml php56-php-pecl-apc php56-php-cli php56-php-pear php56-php-pdo 

9. Once installed PHP, you can use following command to check the default version of PHP used on your server.

# php -v 
Check Default PHP Version

Check Default PHP Version

Step 5: Configuring PHP-FPM and PHP56-PHP-FPM

10. This is the most interesting part of this tutorial, it explains how you can actually run multiple PHP versions on your server. Here, you will configure the different versions of php-fpm that Nginx will work with. You should define the user/group of the FastCGI processes as well as the ports they will listen on.

These are the following two configuration files that you will going to edit.

  • php-fpm (default 7.1) – /etc/php-fpm.d/www.conf
  • php56-php-fpm – /opt/remi/php56/root/etc/php-fpm.d/www.conf

Open the files above, set the user/group of FastCGI processes.

# vi /etc/php-fpm.d/www.conf   [PHP 7.1] # vi /opt/remi/php56/root/etc/php-fpm.d/www.conf  [PHP 5.6]  

The default values should be apache, change them to nginx as shown.

user = nginx group = nginx 

11. Next, find the listen parameters, and define the address:port on which FastCGI requests will be received.

listen = 127.0.0.1:9000	[php-fpm] listen = 127.0.0.1:9001	[php56-php-fpm] 

12. Once all the above configuration done, you need to start and enable Nginx, MariaDB and PHP-FPM to auto-start at system boot.

# systemctl enable nginx  # systemctl start nginx   # systemctl enable mariadb  # systemctl start mariadb   ---------------- PHP 7.1 ----------------  # systemctl enable php-fpm  # systemctl start php-fpm   ---------------- PHP 5.6 ---------------- # systemctl enable php56-php-fpm  # systemctl start php56-php-fpm  

Attention: In case you get any errors while starting the second instance of PHP, php56-php-fpm, a SELinux policy could be blocking it from starting. If SELinux is in enforcing mode, set it to permissive mode, then try starting the service once again.

# getenforce # setenforce 0  

Step 6: Setup Websites with Permissions

13. At this point, you can now create the necessary directories for your websites under /var/www/html/. You also need to create directories to store logs as follows:

---------------- Website 1 ---------------- # mkdir -p /var/www/html/example1.com/  # mkdir -p /var/log/nginx/example1.com/     ---------------- Website 2 ---------------- # mkdir -p /var/www/html/example2.com/ # mkdir -p /var/log/nginx/example2.com/  

14. Set the appropriate ownership permissions on all the directories.

---------------- Website 1 ---------------- # chown -R root:nginx /var/www/html/example1.com/  # chmod -R 755 /var/www/html/example1.com/  # chown -R root:nginx /var/log/nginx/example1.com/ # chmod -R 660 /var/log/nginx/example1.com/   ---------------- Website 2 ---------------- # chown -R root:nginx /var/www/html/example2.com/  # chmod -R 755 /var/www/html/example2.com/ # chown -R root:nginx /var/log/nginx/example2.com/  # chmod -R 660 /var/log/nginx/example2.com/ 

Step 7: Setup Nginx Server Blocks for Websites

15. Now configure how Nginx will process requests to your websites using the server block configuration files which should be located in /etc/nginx/conf.d/.

Create the configuration files for your websites ending with .conf extension.

# vi /etc/nginx/conf.d/example1.com.conf # vi /etc/nginx/conf.d/example2.com.conf 

Then paste the following server block configurations in the respective files.

Website 1

Configuration for example1.com
server {         listen 80;         server_name example1.com www.example1.com;          root   /var/www/html/example1.com/;         index index.php index.html index.htm;          #charset koi8-r;         access_log /var/log/nginx/example1.com/example1_access_log;         error_log   /var/log/nginx/example1.com/example1_error_log   error;         location / {                 try_files $uri $uri/ /index.php?$query_string;         }         # pass the PHP scripts to FastCGI server listening on 127.0.0.1:9000         location ~ \.php$ {                  root    /var/www/html/example1.com/;                 fastcgi_pass   127.0.0.1:9000;	#set port for php-fpm to listen on                 fastcgi_index  index.php;                 fastcgi_param  SCRIPT_FILENAME  $document_root$fastcgi_script_name;                 include         fastcgi_params;                 include /etc/nginx/fastcgi_params;          } } 

Website 2

Configuration for example2.com
server {         listen 80;         server_name example2.com www.example2.com;          root    /var/www/html/example2.com/;         index index.php index.html index.htm;          #charset koi8-r;         access_log /var/log/nginx/example2.com/example2_access_log;         error_log  /var/log/nginx/example2.com/example2_error_log   error;         location / {                 try_files $uri $uri/ /index.php?$query_string;         }         # pass the PHP scripts to FastCGI server listening on 127.0.0.1:9000         location ~ \.php$ {                  root    /var/www/html/example2.com/;                 fastcgi_pass   127.0.0.1:9001;	#set port for php56-php-fpm to listen on 	        fastcgi_index  index.php;                 fastcgi_param  SCRIPT_FILENAME  $document_root$fastcgi_script_name;                 include         fastcgi_params;                 include /etc/nginx/fastcgi_params;          } } 

16. Make sure that you have the following line in the closing part of the http block in /etc/nginx/nginx.conf. It helps to include all configuration files inside the /etc/nginx/conf.d/ directory when Nginx is running.

include /etc/nginx/conf.d/*.conf; 

Step 8: Testing Different PHP Versions

17. Finally, you need to test that your server is using the two versions of PHP. You can create a very basic info.php script in the document root directories of your websites as shown.

# echo "<?php phpinfo(); ?>" > /var/www/html/example1.com/info.php # echo "<?php phpinfo(); ?>" > /var/www/html/example2.com/info.php 

18. To apply all the changes you have made above, you need to restart Nginx, php-fpm and php56-php-fpm. But you can first of all check that the Nginx configuration files for any syntax errors before doing so.

# nginx -t  # systemctl restart nginx php-fpm php56-php-fpm 
Verify Nginx Configuration

Verify Nginx Configuration

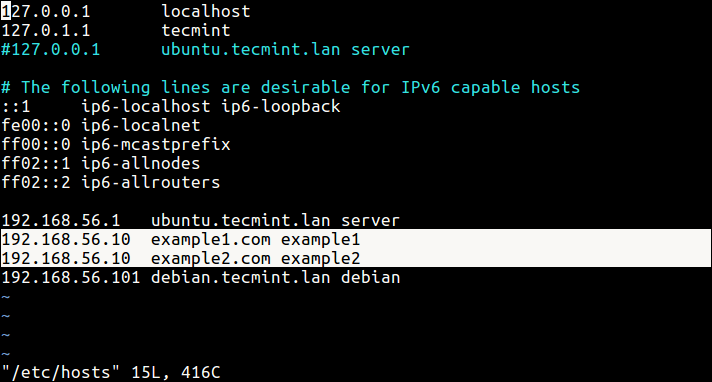
19. There is one other last thing to do, especially if you are running your server locally, you need to setup local DNS using /etc/hosts file as shown in the screen shot below.

192.168.56.10   example1.com   example1 192.168.56.10   example2.com   example2 
Add Websites to-Hosts File

Add Websites to-Hosts File

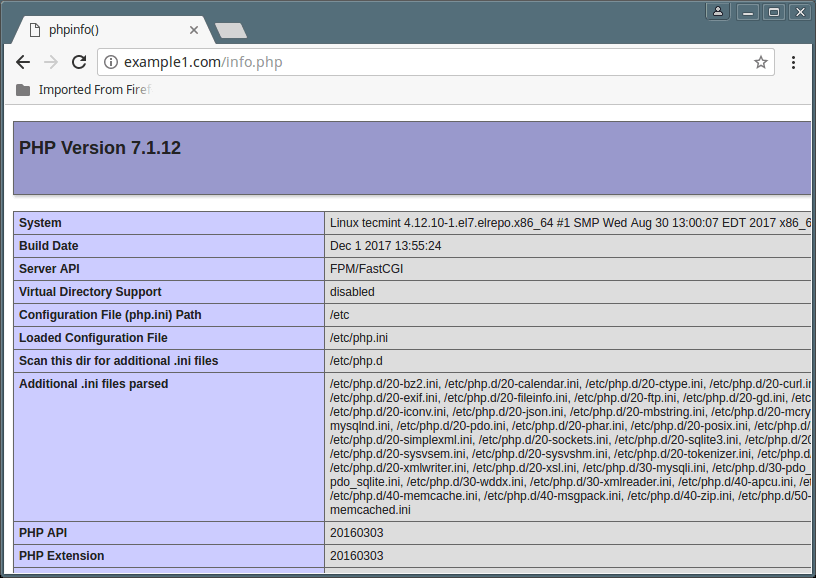
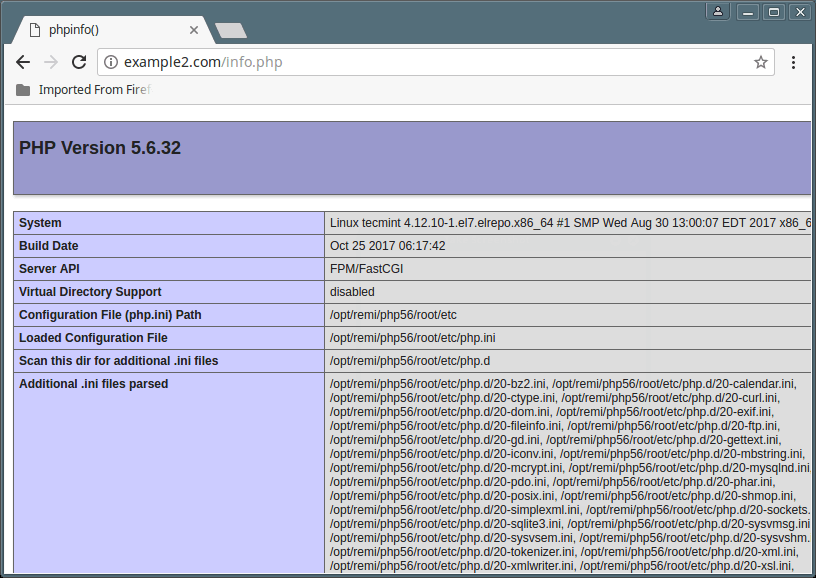
20. Finally, open a web browser and type the following addresses to verify the versions of PHP installed on the system.

http://example1.com/index.php http://example2.com/index.php 
Check PHP 7.1 Version

Check PHP 7.1 Version

Check PHP 5.6 Version

Check PHP 5.6 Version

That's It! Now you can deploy files and test websites with different PHP versions. If you have any additions to make or questions to put forward, make use of the comment form below.


Respectfully yours,

Tiruchirappalli Sivashanmugam
Founder of Arththavial    
Founder President, Genius Mother Institute
Founder President, Intellectual Development Foundation
   p.ss@msn.com
   +91-9444499818
   13/1, Agrahara Manappalli - 637017 - India

விதியில் இல்லாதது மதியில் தோன்றாது